
Tutorials
Creating a LiveClip
Here you will find step by step instructions on how to create a LiveClip.Tutorial requirements:
- LiveClips extension.
- Video files (in VP6: FLV or H.264: .F4V formats) located on any HTTP or RTMP server.
or
- Live broadcats in VP6/H.264 format being streamed through a RTMP server.
Clips vs LiveClips
The difference between Clips and LiveClips is that the LiveClips store absolute paths (URL) to video files or stream. LiveClips work in conjunction with the WebTV video player to allow the playback of videos server/streamed from any HTTP or RTMP server.
NOTE: The user interface of the following screen captures may be different than yours, since it depends on the operating system your are using (Windows XP, Vista, Mac OSX, etc).
Open the WebTV´s Content Administrator. To do it, add /admin to your WebTV´s URL.
Example: http://www.webtvdomain.com/admin
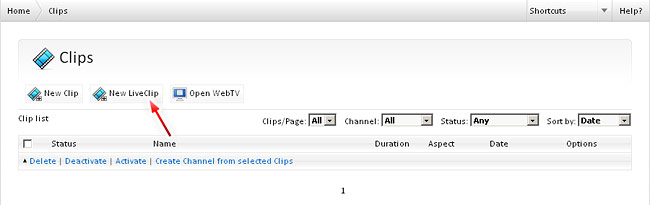
Click on the "Clips" button; the corresponding page will open.
Once inside the "Clips" page click on the "New LiveClip" button:
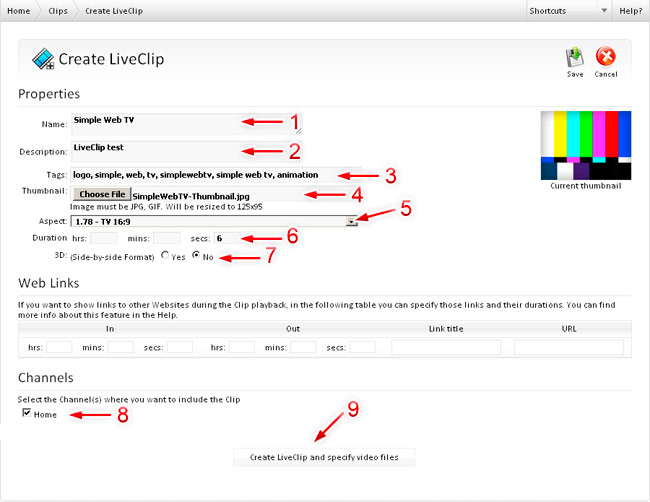
The Clip creation page will open:
1) Enter the "Name" of the LiveClip (up to 100 characters).
2) Enter a complete description.
ADVANCED USERS - TIPS
• You can enter XHTML code into the description field.
• (Simple Web TV 1.1.5+) If you are entering a description which is very long or has XHTML code, it is recommended to also supply an alternative "text-only" description that will be displayed on the iPhone/iPod extension, as well as the search results page. In order to do this, enter a simplified ( unformatted, text-only ) description between the tags [shortdesc] and [/shortdesc].
3) Write some keywords (Tags) related with the clip you are creating. • You can enter XHTML code into the description field.
• (Simple Web TV 1.1.5+) If you are entering a description which is very long or has XHTML code, it is recommended to also supply an alternative "text-only" description that will be displayed on the iPhone/iPod extension, as well as the search results page. In order to do this, enter a simplified ( unformatted, text-only ) description between the tags [shortdesc] and [/shortdesc].
IMPORTANT: Tags must be separated by commas. Tip: it is better to use nouns and verbs for Tags.
Example: video, demostration, turism, enjoy
4) Provide an image "Thumbnail" that will represent the LiveClip in the WebTV. It is recommended to use a representative frame of the video.Example: video, demostration, turism, enjoy
NOTE: For this example, click on the "Browse" button and select the file we supplied with the installation package "SimpleWebTV-Thumbnail.jpg".
5) Select the "Aspect" (aspect ratio), in the drop down menu you will find several options; the most common aspects are 4:3 (standard 1.33) and 16:9 (widescreen 1.78), additionally you will find other aspect ratios used in film.
NOTE: In this example we will use a LiveClip that have a 16:9 aspect ratio, select the "1.78 - TV 16:9" option.
6) Enter an approximate duration for the LiveClip. This value will be shown to the WebTV users.
7) Choose wheter the video is a 3D, stereoscopic, video.
NOTES:
3D video support has only be tested on with conventional progressive/on demand download (HTTP), NO RTMP.
3D video feature not supported on the HTML5/iPhone extension.
8) Select the Channels where you want to include the LiveClip.3D video support has only be tested on with conventional progressive/on demand download (HTTP), NO RTMP.
3D video feature not supported on the HTML5/iPhone extension.
NOTE: From version 1.1.7, and per user's request, the Clip will be inserted as the first Clip for the selected Channel(s).
9) Click on the "Create LiveClip and specify video files" button.
NOTE: All the LiveClip properties can be edited anytime.
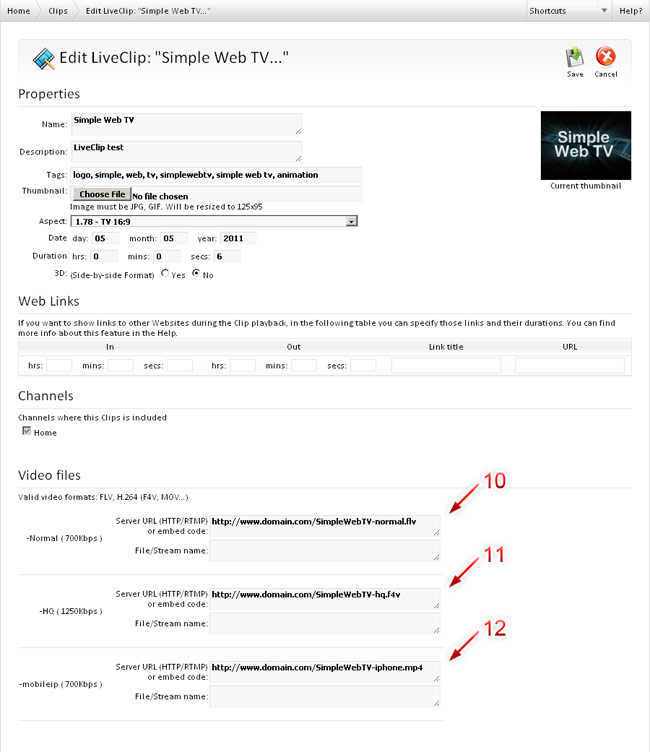
The LiveClip will be created with the supplied information. The following step is to specify the path to the video files.
NOTE: Remember that when you configured your WebTV you defined some Qualities, in this example we have kept the default ones: "Normal" (700Kbps) and "HQ" (1250Kbps), for this reason you will find two slots that will allow you to specify the video file for each of them.
*WARNING: If the thumbnail is not saved or if you see an error message at the right of each Quality, check the end of this tutorial*.
Example for progressive video files stored in a conventional HTTP server:
10) Enter the path (URL) of the file for the first quality (just use the first textfield).
11) Enter the path (URL) of the file for the second quality (just use the first textfield).
12) Enter the path (URL) of the file corresponding to the iPhone extension quality (if any).
(See different cases bellow the image).
NOTE: There are several ways to specify the URL for the files, depending on the server and file type. Here are some examples.
Case FLV (VP6) video file served from a RTMP server:
First textfield (Server): rtmp://www.domain-name.com/folder
Second textfield (File/Stream): video-file.flv
Case F4V (H.264) video file served from a RTMP server:
First textfield (Server): rtmp://www.domain-name.com/folder
Second textfield (File/Stream): mp4:video-file.f4v
Case live broadcast (VP6) streamed from a RTMP server:
First textfield (Server): rtmp://www.domain-name.com/live-application-folder
Second textfield (File/Stream): livestream-name
Case live broadcast (H.264) streamed from a RTMP server:
First textfield (Server): rtmp://www.domain-name.com/live-application-folder
Second textfield (File/Stream): mp4:livestream-name
Case iOS file/stream (always HTTP):
• Files: Please check our Tutorial section for iPhone/iPod Touch video encoding requirements.
First textfield (Server): http://www.domain-name.com/folder/videofile.mp4
Second textfield (File/Stream): leave empty.
• Streaming (HTTP Streaming):
First textfield (Server): http://www.domain-name.com/folder/file.m3u8
Second textfield (File/Stream): leave empty.
Case Live stream iOS (HTTP) and Android (RTSP):
If using the HTML5/iPhone extension (and Simple Web TV 1.5+) you can supply iOS and RTSP URLs of a live stream, by separating the URLs with "///" (four slashes), without blank spaces. Example:
First textfield (Server): http://www.domain-name.com/folder/filename.m3u8////rtsp://www.domain-name/folder/streamname...
Second textfield (File/Stream): leave empty.
If you are accessing files served from a CDN, use the address (URL) they will provide you through their Control Panel. If you have any question, please contact us.
To finish, click on the "Save" button.
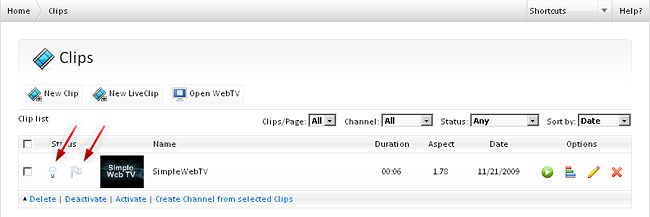
The new LiveClip will appear in the Clip list.
NOTE: Every time a LiveClip is created, it will have an "Inactive" status, the LiveClip won´t be publicly available until you decide to activate it.
Activate the LiveClip by clicking the grey light bulb (once activated it will turn yellow).
Feature the LiveClip by clicking the grey flag (once activated it will turn yellow). Featured LiveClips will appear in the "Featured Videos" panel.
NOTE: If you do not wish to "Feature" a LiveClip, click on the flag icon until it changes to grey.
That´s all! you just have created a LiveClip. Click on the "Open WebTV" button at the top to see the result.
TROUBLESHOOTING
• If the WebTV can not connect with a media server , through RTMP, try to use the tag [fmsai:true] before the RTMP URL (without spaces). Example: "[fmsai:true]rtmp://my.media.server/live/folder/stream". NOTE: Simple Web TV 1.1.10+ required for using this tag.• If you want to force the detection of a stream as "live" use the tag [live] before the RTMP URL (without spaces). Example: "[live]rtmp://my.media.server/live/folder/stream".
• If the URL of your file/stream is a SMIL file, without ".smil" extension, you will have to use the following tag before the SMIL URL [smil] (without spaces). Example: "[smil]http://my.cdn./folder/filename". NOTE: Simple Web TV 1.1.10.1+ required for using this tag.
• If the thumbnail is not saved after saving the Clip, verify the write permissions for the "plantillas/admin/thumbs" folder in your server.
• Do not use special character in file names. Use, preferably, letters (a-z) and numbers (0-9). Some characters like "-" and "_" can be used.
For more information, check the Installation and Configuration tutorials.