
Tutorials
Configuring Simple Web TV
Here you will find step by step instructions on how to configure Simple Web TV.Open the Simple Web TV´s Content Administrator. To do it, add /admin to your WebTV´s URL.
Example: http://www.webtvdomain.com/admin
By default, the Webmaster login info is Username: admin / Password: admin
Click on the "Configuration" button; the corresponding page will open.
NOTE: DON´T FORGET TO CLICK ON "SAVE" WHEN DONE
Configuring Simple Web TV for the first time
If this is the first time you install Simple Web TV, it is better to start configuring the most important aspects and then, when the WebTV is working correctly, proceed to configure the other options explained in this tutorial. In this regard, we recommend to begin with the configuration of the following sections:1. WebTV information: only "Basic info"
2. Videos
3. Server
4. Access Data
1 WebTV Information
◢ Basic Info
Part of the information supplied in this section will be used to optimize the WebTV in order to facilitate the search engine indexing process (Google, Yahoo, Bing, etc.).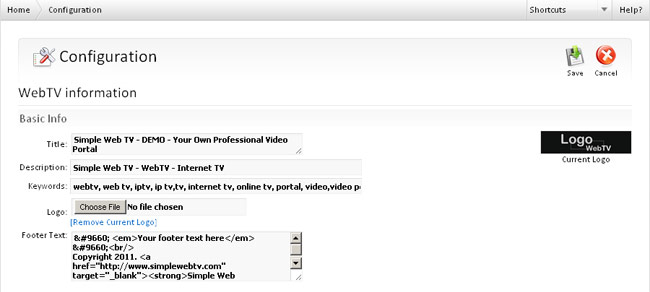
• Title: Enter the name of your WebTV.
• Description: Enter a brief description about your WebTV (the kind of videos the users will find when visiting the WebTV).
Example: "Video portal where you will find the latest toys for boys and girls".
• Keywords: Write some keywords for your WebTV. You can keep the existing ones and add a few more that characterize your WebTV.
Example: if you plan to include touristic videos in your WebTV, your keywords can include words like tourism, travels, vacations, etc.
• Logo: Identify your WebTV with your own logo. We recommend that your logo´s background match the WebTV one (when possible), it will look more professional.
Max size: 920px x 82px. If the image is bigger, it will be resized.
Valid formats: JPG, GIF* (not animated) and PNG*.
*NOTE: the transparency channel of GIF and PNG images will be discarded.
• Footer Text: This text will appear at the bottom of the WebTV (you can include HTML code here).
Example: You can enter your copyright and contact information.
◢ Appearance (Skin)
Customize the WebTV. Choose one among the available themes/skins.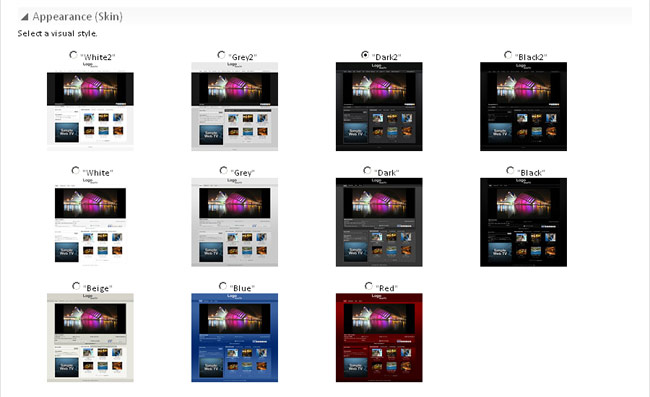
There are two options for integrating (visually) your WebTV with your current company/personal Website´s colors/style:
1. By purchasing the 'a la carte' customization service you will find in the Services page.
2. If you have HTML/CSS knowledges, you can modify the css and image files corresponding to the selected skin. For example, if you want to modify the "Dark" skin, modify the .css files located in "cssDark" folder as well as the images located in the "imagesDark" folder.
◢ "Home" button (Simple Web TV 1.2+)
At the top of the WebTV (at the right of the Channels bar) you can include a button with a link to your Website.
• Title (Anchor): The text that will appear in the button ( leave it blank if you don´t want the button )
• Link (URL): Enter full URL for the link. Must start with "http://"
• Target: Whether you want the link to open in the same window or in a new one.
◢ HTML header (Simple Web TV 1.2+)
If you need to include extra HTML code into the header <HEAD> section of the WebTV, do it here.
◢ Third Party Statistics (Ex. Google Analytics)
If you have a Google Analytics account or work with another tracking tool, you can integrate it very easily with your WebTV. Simply copy the code supplied by the statistic tool (Ex. Google Analytics) and paste it inside the "Statistic tool code:" text field.
◢ Banners
If you have an AdSense, AdBrite or any other online Ad service account, and want to include their banners in your WebTV so you can earn some money, it is very simple: copy the code supplied by the Ad service and paste it inside the corresponding text field.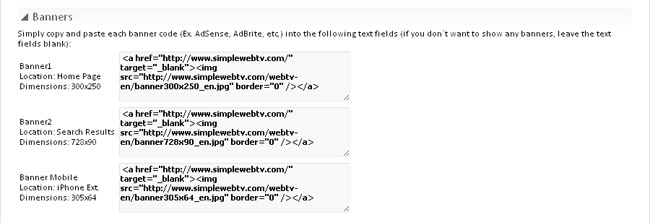
There are three text fields: the first one correspond to the banner located in your WebTV´s Home Page (bellow Search), with a size of 300x250 pixels. The second banner is displayed at the top of the search results page; it is a 728x90 pixels banner. The third banner, 305x64, (from Simple Web TV 1.2+) will be displayed in the iPhone extension.
NOTE: If you do not want to include any banners in your WebTV, just leave the text fields blank.
◢ Facebook Comments System (Simple Web TV 1.2+)
In this section you will be able to configure the integration with the Facebook Comments system.
• Show the "Comments" button: To show or hide the "Comments" button.
• Facebook account ID: Enter the ID of the Facebook account(s) that will be able to moderate the comments. If you are entering more than one, separete IDs by commas.
• Facebook App ID (optional): If you have a Facebook application from where you want to moderate the WebTV comments, enter the App ID in this variable. This will allow you to moderate the comments, more easily, from the centralized Facebook Moderation Tool ( http://developers.facebook.com/tools/comments ).
◢ Additional adjustments (Simple Web TV 1.2+)
In this section will find several adjustments that will allow you to configure Simple WebTV to better fit your needs.
• Channel Group icon: If you wish to change the default character that is appended to the Channel Group buttons, do it here. The default character is " ▼" (downward arrow -triangle- character: ▼ ).
• No. Clips on "Related videos": Max. number of Clips that will be shown in the "Related Clips" section.
• No. Clips/Page "Featured videos": Max. number of Clips (per page) that will be displayed in the "Featured Videos" tab.
• No. Clips/Page "By date": Max. number of Clips (per page) that will be displayed in the "By date" tab.
• No. Clips/Page "Most viewed": Max. number of Clips (per page) that will be displayed in the "Most viewed" tab.
• No. Clips/Page "Top rated": Max. number of Clips (per page) that will be displayed in the "Top rated" tab.
• No. TAGs: Max. number of "Popular TAGs" that will be displayed (bellow the search).
• No. additional TAGs: Maximun number of TAGs that will be displayed in "More TAGs".
• Sort "Featured videos" by: Sorting method for "Featured videos".
• Sort "Related videos" by: Sorting method for "Related videos".
• Show "Related videos": Display condition for "Related videos". If set to "auto" (and the next option is set to "Yes") "Related Clips" will be hidden when watching a Channel (to avoid Clip redundancy). In any case, "Related Clips" will be displayed when a Channel is not being watched.
• Contextualize Clips (on tabs): If set to "Yes", all Clips displayed on "Featured videos", "By date", "Most viewed" and "Top rated" tabs will be gathered from the active channel (if any); otherwise, all active Clips will be displayed into those tabs.
• Play Clips without reloading page: If set to "Yes", when clicking a Clip from the "featured videos", "by date", "most viewed" and "top rated" tabs, the selected Clip will start to play in the video player without reloading the WebTV. If set to "No", every time a Clip is selected the WebTV will reload and play that Clip "isolated".
2 Videos
◢ Qualities/Bandwidth
This section is very important. Here you can define how many Qualities will be available in your WebTV.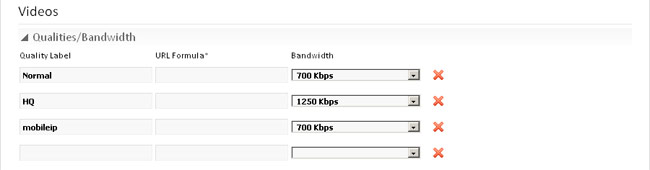
What are qualities?
We will explain this with and example: Video services like YouTube, Vimeo, DailyMotion, etc. have a "HQ" button, when you click on that button a higher quality video is shown. You WebTV also have a "HQ" button, but more complete, since you are not only limited to two qualities, you can specify UP TO 4!.
How many qualities should be specified?
As many as you want. That depends on how many options you want to give to your WebTV users and the time you are willing to spend creating content.
Normally it is a good practice to offer two qualities: a "low" Quality thinking of users with slow connections or old PCs and another "high" Quality for those users with high speed connections or new PCs. There are clients that prefer to work with just one Quality and do not complicate with compressing/encoding videos into multiple Qualities.
By default, Simple Web TV has three predefined Qualities: a "Normal" one (700Kbps), "HQ" (1250Kbps), and "mobileip" (dedicated for the iPhone/iPod extension); those values can be modified.
Warning: to avoid system inconsistencies, once created a Quality you should not change the Bandwidth for that Quality (in case there are Clips already created). It is important to set the value just after installing the WebTV and do not modify them again.
What about defining more than one Quality?
This will imply more work for you but a better user experience. More work for you since you will have to compress/encode your videos for each of the defined Qualities. Better user experience since they will have more options to enjoy the videos.
Quality labels
Is the name associated with each Quality. Labels can be modified anytime without any "harm".
Bandwidth
Choose the bandwidth you wish to assign to each Quality. The specified values will also be used to determine the Quality that will be shown to the users according to their connection speed (the detection occurs every time the WebTV is visited).
For your reference, an ADSL connection of 1Mbps equals 1000Kbps approx, BUT normally that´s not the real speed, for that reason, if you are thinking about defining a Quality for 1Mbps ADSL users, choose a 700Kbps Quality bandwidth in order to guarantee a smooth playback for the users who have that connection speed.
Creating additional Qualities
Simply fill in the empty fields and click "Save", a new Quality will be created.
◢ Qualities: URL Formula
(This feature will only work with the LiveClips extension and Simple Web TV 1.3.1+).The URL formula allows you to integrate Simple Web TV with CDNs based on one-point file publishing, through FTP (see "Server" section, bellow), and URL "formulas" for content access.
When you upload a video to the WebTV, it is uploaded through FTP to the destination server, and the only data stored in the database is the file name. The final URL to the video file is generated at playback time, by using the formula. If no formula is entered then the HTTP URL specified in "Server" section (see bellow) is used instead. Likewise, if you use the URL formula, it will override the HTTP URL value specified in "Server" section (see bellow).
How to create a formula?. It is very easy, we explain it with the following example: http://my.cdn/app/folder/{filename.ext}.smil In the previous example, you could see the tag "{filename.ext}", that tag indicates the WebTV where to include/replace the video file name, when generating the final URL to access it.
◢ Qualities: iPhone/iPod Touch support
If you plan to include iPhone/iPod Touch compatible videos in your WebTV, make sure to keep a quality with the label "mobileip" with the desired bandwidth. Then, a new slot for uploading videos will appear when creating or editing Clips. The new slot/quality will allow you to upload iPhone/iPod Touch compatible videos that will only be played back on the iPhone/iPod Touch version of Simple WebTV.3 Server
In this section it is necessary to specify the information that will be used by the system in order to upload videos through FTP as well as the HTTP access route to the video files.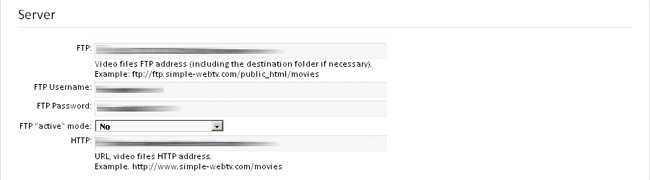
Why is it necessary to specify FTP and HTTP access routes?
The WebTV has been designed in a way that the video files could be stored in a different server than the one that hosts the WebTV itself. For this reason, the video files are uploaded to a FTP server and, therefore, it is necessary to specify the HTTP address to access them.
FTP
Enter the FTP address where the video files will be stored.
Example: ftp://ftp.webtvdomain.com/httpdocs/movies
NOTE: It is recommended to create a new FTP account and direct it to the target folder where the video files will be stored. It is a safer way and you just have to enter the FTP server without the target folder.
Example: ftp://ftp.webtvdomain.com/
FTP Username / FTP Password
Login info for the FTP server.
FTP "active" mode (Simple Web TV 1.2+)
Some servers require the "active" FTP mode for file transferring (most don´t). If you have problems uploading videos, select "Yes".
HTTP
Specify the HTTP address in order to access the video files.
Example: http://www.webtvdomain.com/movies
4 Access Data
Here you can modify the username and password of the Simple Web TV´s Content Administrator accounts.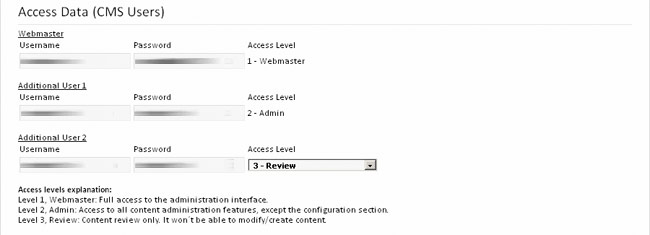
IMPORTANT: for security reasons, you must change the access info of the three accounts.
DON´T FORGET TO CLICK ON "SAVE" WHEN DONE...
Sitemap
Simple Web TV has a dynamic sitemap that you can supply to Google, Yahoo or Bing through their Webmaster tools, this will easy the search engines´ indexing process.The Sitemap address is the address of your WebTV, adding /sitemap.php
Example: http://www.webtvdomain.com/sitemap.php
Video Sitemap
Besides the standard sitemap, Simple Web TV also includes a dynamic video sitemap you can supply to Google, through Webmaster tools. This will allow your videos to be indexed by Google and included in the video search results.The Sitemap address is the address of your WebTV, adding /videositemap.php
Example: http://www.webtvdomain.com/videositemap.php
5 Verifying the correct operation of the WebTV
Once configured your WebTV, and to verify everything is OK, the next thing to do is create a Channel and then create your first Clip.» Creating a Channel
» Creating a Clip