
Tutorials
Clip Batch Creator
This optional tool will assist you with bulk uploading of video files. It will allow you to create Clips/LiveClips from a file list.Using the Clip Batch Creator
Here you will find step by step instructions on how to use this tool.Tutorial requirements:
- Simple Web TV version > 1.1.9.1
- Clip Batch Creator extension.
- LiveClips extension (for creating LiveClips...)
NOTE: The user interface of the following screen captures may be different than yours, since it depends on the operating system your are using (Windows XP, Vista, Mac OSX, etc) and WebTV´s content.
Open the WebTV´s Content Administrator. To do it, add /admin to your WebTV´s URL.
Example: http://www.webtvdomain.com/admin
Click on the "Clips" button; the corresponding page will open.
Once inside the "Clips" page click on the "Batch Creator" button:

The Clip Batch Creator page will open:
NOTE: The first page will be different depending on the presence of the LiveClips extension. If it is not present, then the tool will automatically skip to Processing Option "B".
Select the batch processing option you would like to use.A) From file list on text file (for creating LiveClips). Useful when video files are stored on a CDN or Media Server.
B) Video files uploaded to the WebTV´s movies folder (will create standard Clips).

A. Batch processing from a file list on text file
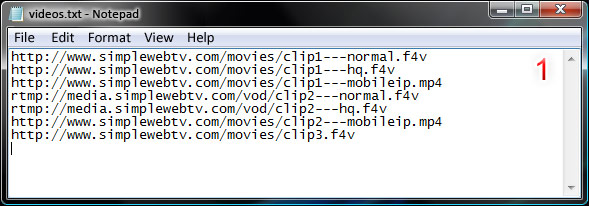
1) The first thing you have to do is create a text (.txt) file with the list of video files URLs. Use the Notepad (Windows) or any other plain text editor for doing this.
Example:
NOTES:
• Enter only one file name per line.
• The following file naming convention is required: <server>/<clip_name>---<quality_name>.<extension>
"< server>/": standard URL format. like http://www.servername... or rtmp://www.mediaservername...
"<clip_name>": must not contain special characters, only alphanumeric ones (A-Z, a-z, 0-9).
"---": quality name separator (must be three dashes).
"<quality_name>": must match one of the name of the qualities specified in the Configuration section of the WebTV.
".<extension>": must be smil, f4v, flv, mp4, m4v or mov.
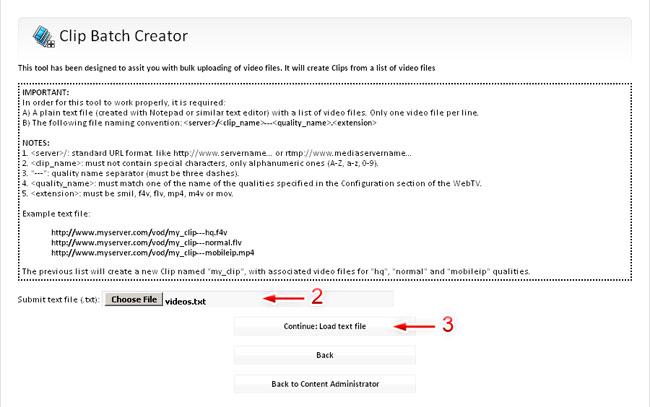
2) Browse and supply the previously created text file list.
3) Click "Continue" to load the file.
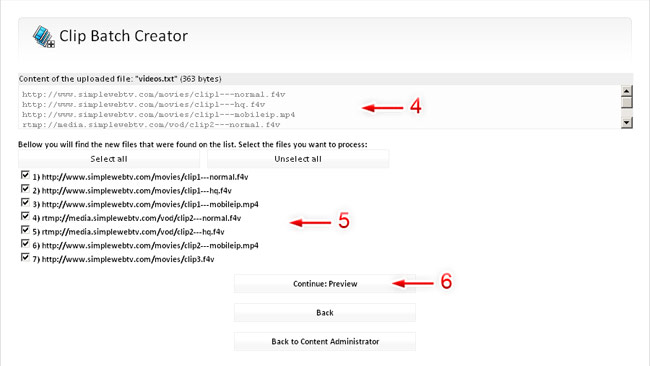
4) Check the content of the uploaded text file.
5) Select the file(s) you want to process.
NOTE: Only new files will be presented on the selection list.
6) Click "Continue" to preview the batch creation operation (no Clips will be created until you confirm on next step).
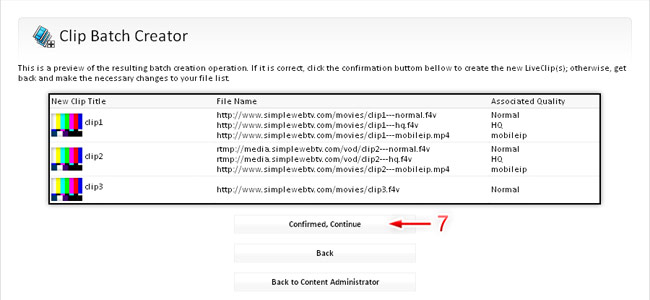
The preview page will allow you to decide wheter you want to proceed or not. The list will display the resulting new LiveClips and how the file names will be associated to the WebTV´s qualities.
7) If everything is OK, then click on "Confirmed, Continue" to create the new LiveClips. In case there is anything wrong, click con "Back" and upload a new text file.
B. Batch processing from WebTV's movies folder
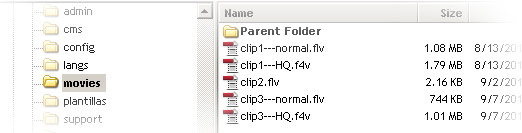
This option will get the content (file list) of the WebTV´s movies folder by connecting through FTP, using the configuration data of the WebTV.1) The first thing you have to do is upload the desired files to the WebTV´s movies folder, using a FTP program.
Example:
NOTES:
• The following file naming convention is required: <clip_name>---<quality_name>.<extension>
"<clip_name>": must not contain special characters, only alphanumeric ones (A-Z, a-z, 0-9).
"---": quality name separator (must be three dashes).
" <quality_name>": must match one of the name of the qualities specified in the Configuration section of the WebTV.
".<extension>": must be f4v, flv, mp4, m4v or mov.
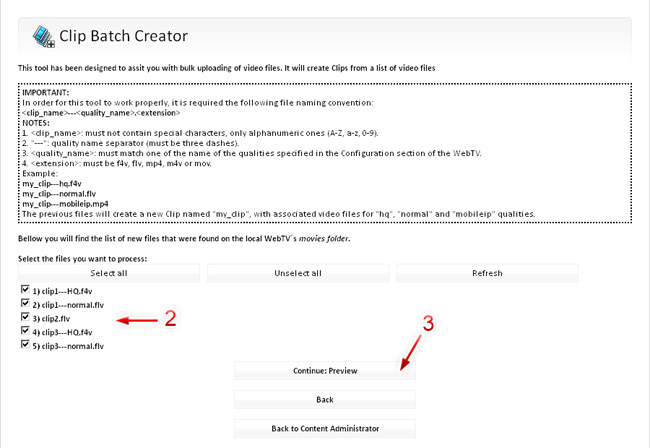
2) Select the file(s) you want to process.
NOTE: Only new files will be presented on the selection list.
3) Click "Continue" to preview the batch creation operation (no Clips will be created until you confirm on next step).
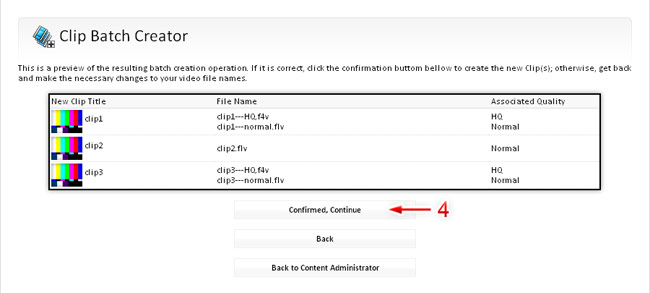
The preview page will allow you to decide wheter you want to proceed or not. The list will display the resulting new Clips and how the file names will be associated to the WebTV´s qualities.
4) If everything is OK, then click on "Confirmed, Continue" to create the new Clips. In case there is anything wrong, click con "Back" and modify the file names as required.
That´s all! your new Clips/LiveClips will appear on the Clips list.